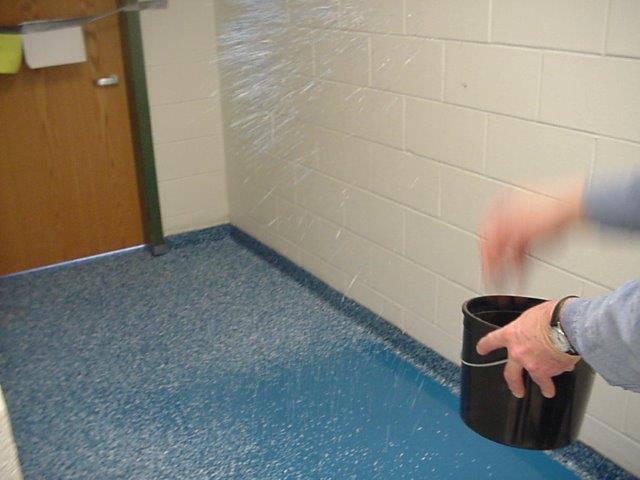
 One
of the unique advantages of seamless flooring is the ability to
build an integral cove base. This integral cove allows you to create
a virtual bathtub or shower base out of your seamless floor.
Building this cove was a difficult job until the introduction of
Epoxy.com Product #720 Coving Gel
www.epoxy.com/720.aspx. The coving
gel is mixed with special fillers to create an easy to install custom built
floor to wall base cove.
One
of the unique advantages of seamless flooring is the ability to
build an integral cove base. This integral cove allows you to create
a virtual bathtub or shower base out of your seamless floor.
Building this cove was a difficult job until the introduction of
Epoxy.com Product #720 Coving Gel
www.epoxy.com/720.aspx. The coving
gel is mixed with special fillers to create an easy to install custom built
floor to wall base cove.
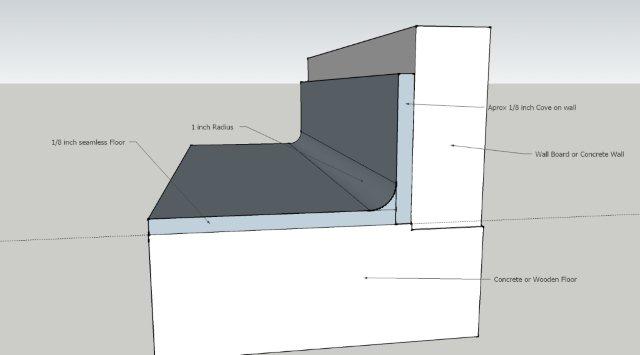
Advantages of a Cove Base
- Prevents water from going under the walls
- In chemical containment applications contains the chemicals to the coved
area
- Makes it easy to clean and disinfect the edges of the floor
- Does not allow bacteria or insects to hide under the wall
- Gives the floor an attractive professional seamless look
- Required by government officials in many food and pharmaceutical
applications
Step 1, Surface Preparation
All high quality installations begin with proper surface
preparation. The substrate must be clean, solid and porous. The
substrate must be free of paint, sealers, oil, grease or any other
contaminants that will interfere with the soaking in of the epoxy
primer
www.epoxy.com/surfaceprep.aspx. Be sure the floor and wall in the areas near
the cove are clean. That will help prevent dragging dirt and other contamination
into the cove and make the tape to mask the cove stick better.
Step 2, striking a line
Cove is typically installed at 4 inches high, but specialty applications may be
as little as 2 inches or as much as 6 or 8 inches or even more. Once you know
the height of the cove it must be decided if the top of the cove will follow the
contour of the floor or be level on the top. Most floors look best with a level
top to the cove.
Strike a line with a laser level or a chalk line. Mask with a strong firmly
bonding tape like duct tape. Be sure it is pressed down and securely stuck to
the wall.
Step 3, priming
Make a small batch (1 cup A to 1/2 cup of B) of Product #899 primer. Apply the primer on to the area to
receive cove. This application is typically done with a brush or mini roller. It
is important not to put the primer on too thick or it will run. You just need to
have enough primer to give the surface to receive the cove a wet look.
If you have a very porous substrate and the primer soaks in and doesn't look
wet, a second coat of primer may be required. A typical substrate that will
sometimes need a second is sheetrock. If a second coat if primer is required it
can be put on before the first coat has hardened. Remember never to wait
more than 1 day before recoating any epoxy.
Step 4, mixing the cove material
After the primer gets tacky and before the primer gets tack free (not sticky to
the touch) you will need to install your #720 cove mix. If your primer becomes
hard before you start troweling up you cove you must prime again. Colored quartz
has different coving batch formulations than other seamless flooring types. Be
sure to consult www.epoxy.com/720.aspx,
for more information about cove mixes.
Step 5, troweling up the cove
Using a margin trowel "rough in" the cove mix material onto the wall where the
cove is going. Be careful not to lift the tape creating the top seal in the
process. Smooth the cove to shape using a cove trowel.
After the cove starts to get slight stiff it is time to make a final pass at
smoothing the cove with your coving trowel. Be sure not to wait too long or the
tape will be difficult to impossible to remove. Be sure to keep our trowel clean
so it doesn't drag the epoxy cove material and make it rough again.
A few drops of a dish washing detergent (like Dawn) in warm water make a great
way to clean your trowel and slick up the cove. Use a rag to clean the cove in
the water. Remove the cove trowel from the water and remove the excess water.
Then return to slicking down your cove.
Once the cove is smooth enough, remove the duct tape, carefully. Remove the tape
at an angle pulling the bottom first so the excess coving material on the tape
stays on the tape and does not fall onto the cove. If pieces do fall on the cove
gently remove the pieces and gently smooth out the damage.
Use our margin trowel to smooth the top of the cove where you just removed the
duct tape. Use the warm water and dishwashing detergent to keep your trowel
clean and slick the top of your cove.
Clean the excess material off from the bottom edge of your cove, unless you have
already done this earlier.
Step 6, sealing the cove
After the coving material has hardened overnight, inspect and lightly sand out
any minor imperfections.
Apply appropriate sealers (listed below). When in doubt, contact Epoxy.com
Technical Support. Apply coating/sealer over the cove by brush and/or squeegee.
Be sure that you do brush out or squeegee out any runs. Keep going back and
checking for runs until satisfied that the glaze (top coating / sealer) will not
run.
- Quartz coves are sealed by applying Epoxy.com Product #15
www.epoxy.com/15.aspx.
- Pigmented Epoxy Coatings, use the same material that you are using on the rest
of the floor.
- Chip Flooring.
- Apply Epoxy.com Product #315 Top Coating by brush over the cove mix.
- Then broadcast the cove into the wet material. If you are careful you can push
the chip up into the coating with your hand or a piece of cardboard or similar
material.
Step 7, install your floor
Install your floor in accordance with manufacturer's recommendations.